Preconfiguring the scanner in the A5000 viewer
The basic configuration of the scanner can be done via Cognex A5000 Viewer independently from EasySightPro®. For this purpose, some network settings should be made in Windows 10 first:
After the IP of the computer and scanner have been set, the A5000 Viewer can be started to configure the scanner. The basic configuration set in the A5000 Viewer can be changed in EasySightPro® via the image acquisition settings. However, this is optional!
Via File -> Connect the scanner can be searched and connected.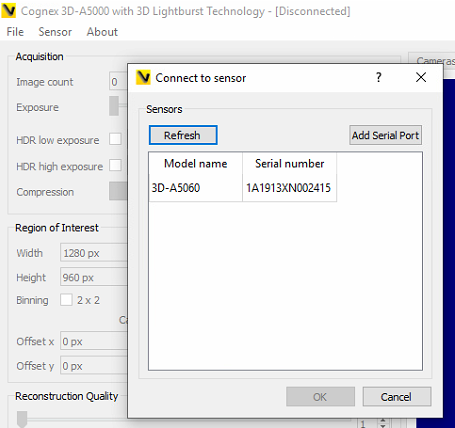
After that, the image settings of the device can be changed on the left side.
Starting at the top left with the Acquisition settings, the scanner is parameterized.
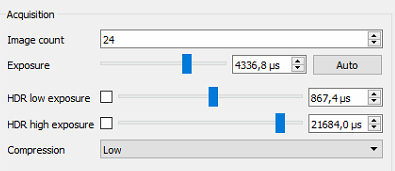
| Image Count | Can be selected from 12 to 60. Higher values improve image quality, but also increase capture and processing time. |
| Exposure | Can be set with automatic using Auto button or selected manually. The image should not be overexposed. |
| High Dynamic Range (HDR) settings | Adds another one with higher or lower exposure time to the image capture. Useful for bodies with very dark or highly reflected elements. Increases the image acquisition time. Not available for continuous image capture. |
| Compression | Low Compression retains a wider range of pixel values. Compression compresses the pixel values and should be used in conjunction with increased exposure time (approx. 4x). Do not use Compression in conjunction with HDR! |
Below this, the field of view of the cameras can be adjusted in Region of Interest.
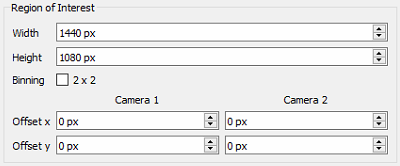
| Width | Adjustable from 80 to 1440 pixels |
| Height | Adjustable from 4 to 1080 pixels |
| Binning 2x2 | Combines two adjacent pixels into one Increases the light sensitivity of the sensor, which improves the quality of dark images. Reduces the amount of data and improves processing time. Reduces the resolution to a quarter. |
| Offeset x and y | Leave default (0)! |
In the slider below you can set the quality of the point cloud calculation.
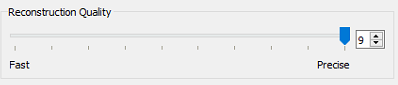
| Reconstruction Quality | Adjustable 0 to 9. Low values improve the evaluation speed, high values improve the quality at the expense of speed. |
Here the image can be filtered before the point cloud is calculated, is:
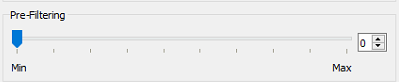
| Pre-Filtering | Pre-filtering Values from 0 to 9 High values reduce the computing time, but filter away more pixels |
After that the point cloud itself can be filtered:
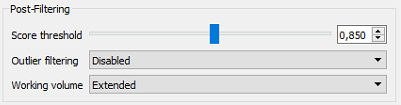
| Score threshold |
Minimum quality requirement for one point of the 3D image. Higher values improve the quality, but reduce the number of points in the 3D image. Congex recommends values between 0.7 and 0.95. |
| Outlier Filtering |
Selectable are: Disabled; Permissive, Balanced and Strict. Filters outliers from the point cloud, with stricter settings there is a risk of losing desired points. |
| Working Volume |
Can be selected between Standard and Extended Extended offer a larger working volume at a lower resolution. |
Now the desired volume of work is defined:
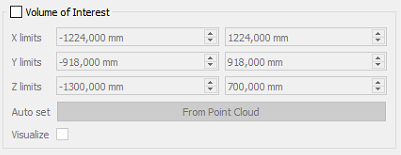
By default, this area is not enabled and the scanner uses the whole working volume.
If desired, the volume can be defined here in X, Y and Z direction.
Auto set form Point Cloud sets the volume of work according to the currently injected point cloud.
For visualization, a frame can be inserted, which visualizes the limits of the work volume.
At the beginning, the Region of Interest and the Volume of Interest should not be limited in order not to cut away the object to be scanned.
Under Run Sensor the scanner can be triggered:
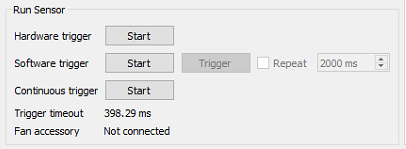
For triggering, the trigger must first be started, then the scanner accepts a signal for triggering.
| Hardware Trigger | Triggering the trigger via signal of the I/O cable |
| Software Trigger | Trigger by pressing the trigger button in the A5000 Viewer |
| Continuous Trigger | Continuous trigger, scanner runs continuously and produces as many images as possible |
As soon as the configuration is satisfactory, the setting can be saved on the sensor under the Sensor tab. This is done under Sensor -> Sensor -> Save Configuration, and is confirmed with a message of successful saving.
After that the sensor can be added in EasySightPro®.